How to create a micro-module for your course?
Creating a micro-module might be a challenging task for some teachers. It starts with a goal or a vision of how you would like your students to benefit from the module; what kind of specific topic or specific (engineering) concept you want your student to learn from the micro-module, etc.
Bear in mind that there is no fixed rules on how to make a good or excellent micro-module. You are the one to decide and set the bar. It can be very simple, and it can also be of high quality and time consuming to produce. We suggest you starting to share and discuss your course outline with an instructional designer and plan your micro-module as early as possible. A highly produced micro-module can be very rewarding both for the teachers and the students.

Planning & Production Stages in Creating Micro-Modules
The application of systematic design procedure can help the process of micro-module production to be more effective, efficient and relevant. The widely known ADDIE model (Analyze, Design, Develop, Implement and Evaluate) can be used as a starting methodology to design a systematic instruction for your micro-module.
Let's have a look at each of those elements and how we can apply that in our micro-modules.
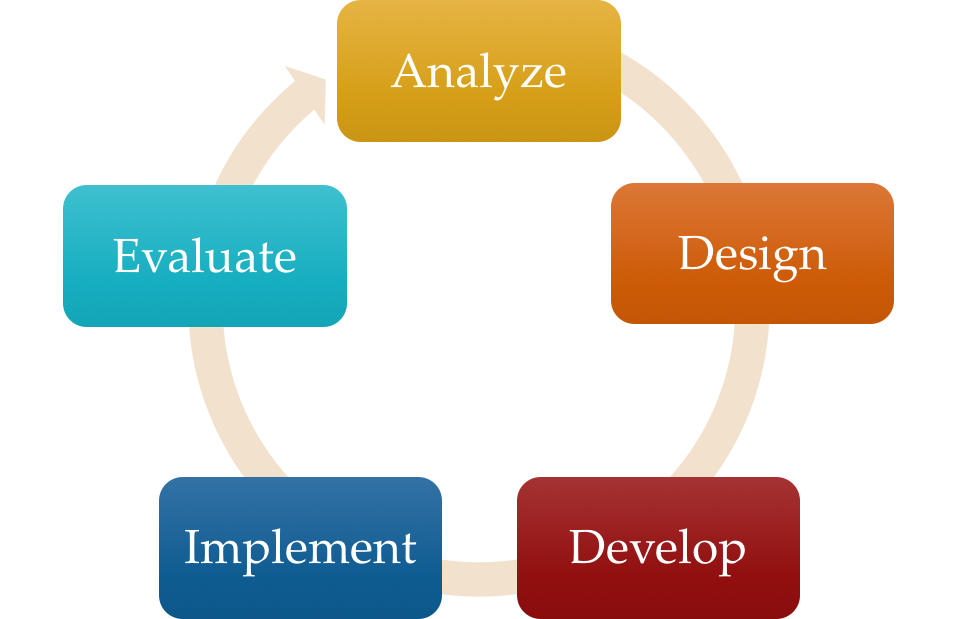
Analyze
Design
Develop
Implement
Evaluate
1. Analyze
This is the starting point when we plan the content of the module. It begins by conducting the needs (learning) assessment and setting the goals or objectives for each micro-module.
Scenario
Analysis: 65% of Year 1 students struggle to understand the concept of "XYZ Equation"
Goal: Increase knowledge of "XYZ Equation". 80% pass rate in short assessment or mini quiz to ensure understanding of the topic.
- Learning assessment
- Strategy
- Planning
- Objectives
2. Design
This stages involves writing and detailing the learning activities. We decide the media and tools that we would like to use for the micro-module e.g. lab video, motion graphic, animation, music, comedy, PowerPoints slide, screen recording, interactive, games, etc.
Scenario
Design: Developing a cartoon character "Mambo" as a virtual trainer to help the students learn "XYZ" concept.
Micro Module: 5 minutes animation video to explain the concept of "XYZ Equation" with real life application and examples.
Storyline: comedy, fun, humour, music
Assessment: mini quiz - 10 multiple questions
Target: 80% pass rate
Project management & schedule for development stage
- Concept development
- Learning activities
- Storyline
- Media & tools
3. Develop
This also called as the production and the actual development of the micro-module materials.
Scenario
1) Pre-production: the first step of creating the animation. The tutor prepares the script, discusses and develops the storyline with the instructional designer or scriptwriter; submits the script to an illustrator to develop the storyboard.
2) Production: Once the storyboard is produced, the animator will work to draw the characters and move the key frame in motion graphic or animation software such as After Effects, 3Ds Max, or Blender.
3) Post-production: The animator will complete the drawing and keyframe process of each character in animation software following the storyboard and edit cut list for each breakdown scene. Final rendering process of the completed animation timeline to a 5 minutes 4K or HD resolution video clip.
This also includes preparing the text, reading materials and quizzes.
- Pre-production
- Production
- Post-production
4. Implementation
The completed materials including animation, PDF notes, readings, quizzes are uploaded to Learning Management System (LMS) platform. There are many available LMS platforms (Blackboard, KEEP, Moodle, Open EdX, etc.) for storing the resources. We recommend you to try the system beforehand and choose the one which fits your teaching style and needs.
The next step is to launch a pilot test and make announcement to your students that a micro-module material is ready for them to watch and study as needed 24/7. Ask the students to create an account on a LMS platform of your choice, then follow the instructions and finish the assessments at the end of the module.
- LMS
- Pilot test
- Assessments
5. Evaluation
The evaluation is essential to assess the overall learning and teaching process (productivity level and effectiveness) through micro-module instruction. This can be done in the form of online surveys, questionnaires, interviews, feedback or focus group. Revise and enhance the module materials following the evaluation results.
- Review
- Surveys
- Revise
- Enhance
Micro-Modules
According to ITSC eLearning Team of the Chinese University of Hong Kong, micro-module is a part of micro-learning. It is a way of teaching and delivering content to students in small and very specific bursts that is used to support blended learning and encourage teacher-student discussion in flipped classroom.
Example
As you plan and develop micro-modules for your course, at the same time you can also gain inspiration and learn from various style and micro-module example videos available from the link below.
Resources
Dive more from our inspirational list of internal and external resources of eLearning industry leaders and practitioners